The Seam That Holds a Shape: What Garment Construction Can Tell You
Garment seams reveal how a piece is shaped and joined. Learn to read seam placement, shaping and finishes without mistaking appearance for proof of quality.
The common mistake when reading garment seams is to treat a neat, straight line as proof that the whole piece is well made. That can lead you to miss the more useful clue: where the seam sits and how its path helps the cloth form the shape you see. Garment seams are easier to understand when you read them as part of a design, not as a grade.
Garment seams show where flat cloth is shaped
Most cloth begins as a flat surface, while a body is three-dimensional. A garment pattern divides that surface into pieces, and seams join those pieces. Shape may come from a curved cut, a tuck, a dart or the way separate panels meet. A seam is the visible or hidden join between pieces, but its position can also reveal how the designer has organised the garment.
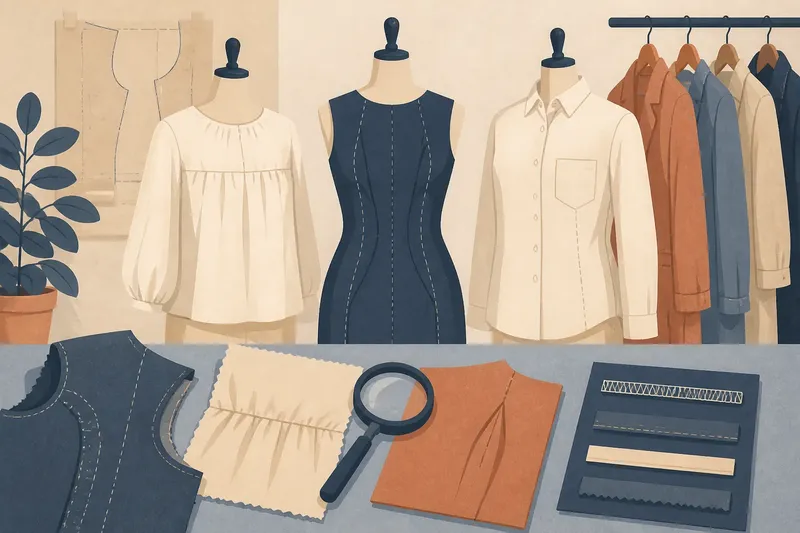
Consider a fitted shirt. Its side seams join the front and back, while darts may take in extra cloth near the bust or waist. A jacket might use several shaped panels instead, distributing the curve along seams that run from the shoulder or armhole towards the hem. Both approaches can create a close outline, but they do so through different pattern layouts.
A seam’s presence alone says little about quality. A visible line may be a necessary join, a decorative feature or both. To interpret it, look at its direction, what pieces it connects and how the surrounding cloth falls.
Seam placement changes the outline you see
A seam can draw the eye along the body as well as join fabric. Vertical seams often make a garment’s shape legible from shoulder to hem. Curved seams can trace a contour, while horizontal joins divide the garment into areas. The effect depends on the garment’s cut, fabric and styling; no seam placement has one universal result.
A shoulder seam usually marks where the garment’s front and back meet over the shoulder. If it sits well forward or behind that point, the shift may be deliberate, or it may alter how the shoulder appears to sit. A dropped shoulder moves the join down the arm, creating a different outline from one with a seam close to the shoulder edge.
Panel seams offer another clue. On a dress, long curved seams can replace separate waist darts and create a continuous fitted line. On a coat, panels may shape the chest and back without placing all the shaping at the sides. The line marks a choice about where the pattern’s shaping is distributed.
Darts and gathers shape cloth in different ways
A dart is a folded wedge of fabric stitched down to remove fullness. It often tapers to a point, allowing a flat piece to sit closer to a curved area. Darts may be placed at the bust, waist or shoulder blade, then pressed in a direction suited to the design. Their stitched lines can be visible, but shaping is usually their main purpose.
Gathers take a different route. A longer piece of fabric is drawn into a shorter section, producing small folds rather than a smooth, tapered contour. Gathers can add fullness at a waist, cuff or yoke. Pleats also control fullness, but fold cloth into more organised, usually sharper forms. Each technique creates a different surface, reflecting both the pattern and the construction method.
Say you are comparing two blouses with similar necklines. One has a dart running from the side towards the bust; the other has a gathered seam below the yoke. The first may show a smoother, more directed contour, while the second may hang with soft fullness below the join. That visible difference helps explain the design, but it does not establish how carefully either blouse was made.
Seam finishes depend on fabric and purpose
A seam finish controls the raw fabric edges inside the garment. A serged finish uses an overlocker to wrap thread around an edge. A turned-and-stitched finish folds the edge under and secures it. Binding encloses the edge with a narrow strip of fabric, while a French seam encloses the raw edges within the seam itself. Each method suits different fabrics, construction choices and levels of bulk.
Look inside as well as outside. Check whether seam allowances lie flat, whether edges are enclosed or exposed, and whether the finish seems suitable for the cloth. A bulky finish may feel uncomfortable in a lightweight blouse. An exposed edge may fray more readily when the fabric and construction make that likely. These are practical observations, not a universal ranking.
Stitching is another clue, but it needs context. A straight line can look tidy and still sit poorly if the seam puckers or pulls the cloth out of shape. Conversely, a casual garment may use visible topstitching as a deliberate feature. Notice whether the stitches follow the intended seam path and whether the fabric lies smoothly around them. One detail cannot tell you how the entire garment will wear.
Which seam details answer common questions?
What does a curved seam tell you?
A curved seam often joins pieces cut to create a contour, such as a shaped bodice or panelled jacket. It shows where the pattern distributes shaping, but the curve alone cannot confirm that the garment will fit a particular body.
Why are some seams visible on the outside?
Some joins are left visible as a design feature, while others are emphasised with topstitching. The line may define a panel or contribute to the visual design; assess its purpose in relation to the rest of the garment.
Does a finished inside edge mean better construction?
A finished edge can help control fraying and make the interior neater, but suitable finishes vary with fabric and garment use. Consider how the finish is executed and whether it makes sense for that seam.
Can seam placement explain a garment’s fit?
It can explain part of the shaping strategy, such as where a dart or panel takes in fullness. Fit also depends on the pattern, fabric behaviour and body movement, so seam lines are clues rather than a verdict.
Use a short inspection to read garment seams
Follow this sequence to connect visible details with construction choices. Each observation points to a useful next question, rather than a verdict about the whole garment.
- Check the silhouette and identify where the garment becomes fitted; if shaping is concentrated around the bust, waist or shoulder, follow those areas first, otherwise begin with the shoulder and side seams.
- Check where the shoulder seam meets the body; if it sits near the shoulder edge, note that placement, otherwise consider whether a forward, rearward or dropped position appears to be a design feature.
- Check whether shaping comes from darts, gathers, pleats or curved panels; if you find one, trace where it begins and ends, otherwise look for shaping distributed through the side or waist seams.
- Check whether a seam lies flat without puckering or pulling; if the cloth looks smooth around it, continue to the next join, otherwise inspect whether the fabric’s weight or the seam’s construction may explain the distortion.
- Check the inside edge and seam allowance; if the raw edge is enclosed or controlled in a way that suits the fabric, note the finish, otherwise consider whether the exposed edge could fray or feel bulky in use.
- Check whether visible stitching follows the seam and sits evenly; if it appears intentional and the cloth lies smoothly, read it as a design or construction detail, otherwise avoid treating neatness alone as evidence of quality.
Not every seam needs close inspection. On a simple, loose-fitting garment, tracing every stitch is unlikely to add much beyond a quick look at the joins and interior. Give attention to areas where construction changes the shape: fitted sections, curved panels, shoulder joins and gathered sections.
Imagine a jacket with a smooth-looking front and several curved panels across the back. You notice that the panels begin near the shoulder, meet along curved joins and continue towards the hem. You turn the jacket inside out and see that the allowances lie flat, while one edge is bound. The observable result is a back shaped through several panels, with a finish that controls that edge; the inspection does not settle how the jacket will fit or wear overall.
Reading garment seams this way helps distinguish shaping from decoration and finish from function. Near the end of an inspection, return to the main question: what does each seam connect, what shape does it help form, and does its construction suit the cloth and purpose of the garment?